Browsing Tag

hair

Looks

Retro Curls

December 5, 2013

candiceswanepoel5-628x837

I pretty much have 3 hair styles in my rotation – straight, Victoria Secret curls, and a ballet bun.  It is pretty rare for me to mix it up, but sometimes you need to “fun it up” and with the holiday season in full swing, a new-do is a simple and easy way to shake things up.   This retro curls tutorial is a surprisingly quick way to glam up your holiday look (I have done this for a black tie that I had 30 minutes to get ready for  – after work!! and had time to spare!!) and it also looks amazing in a pony the next day…

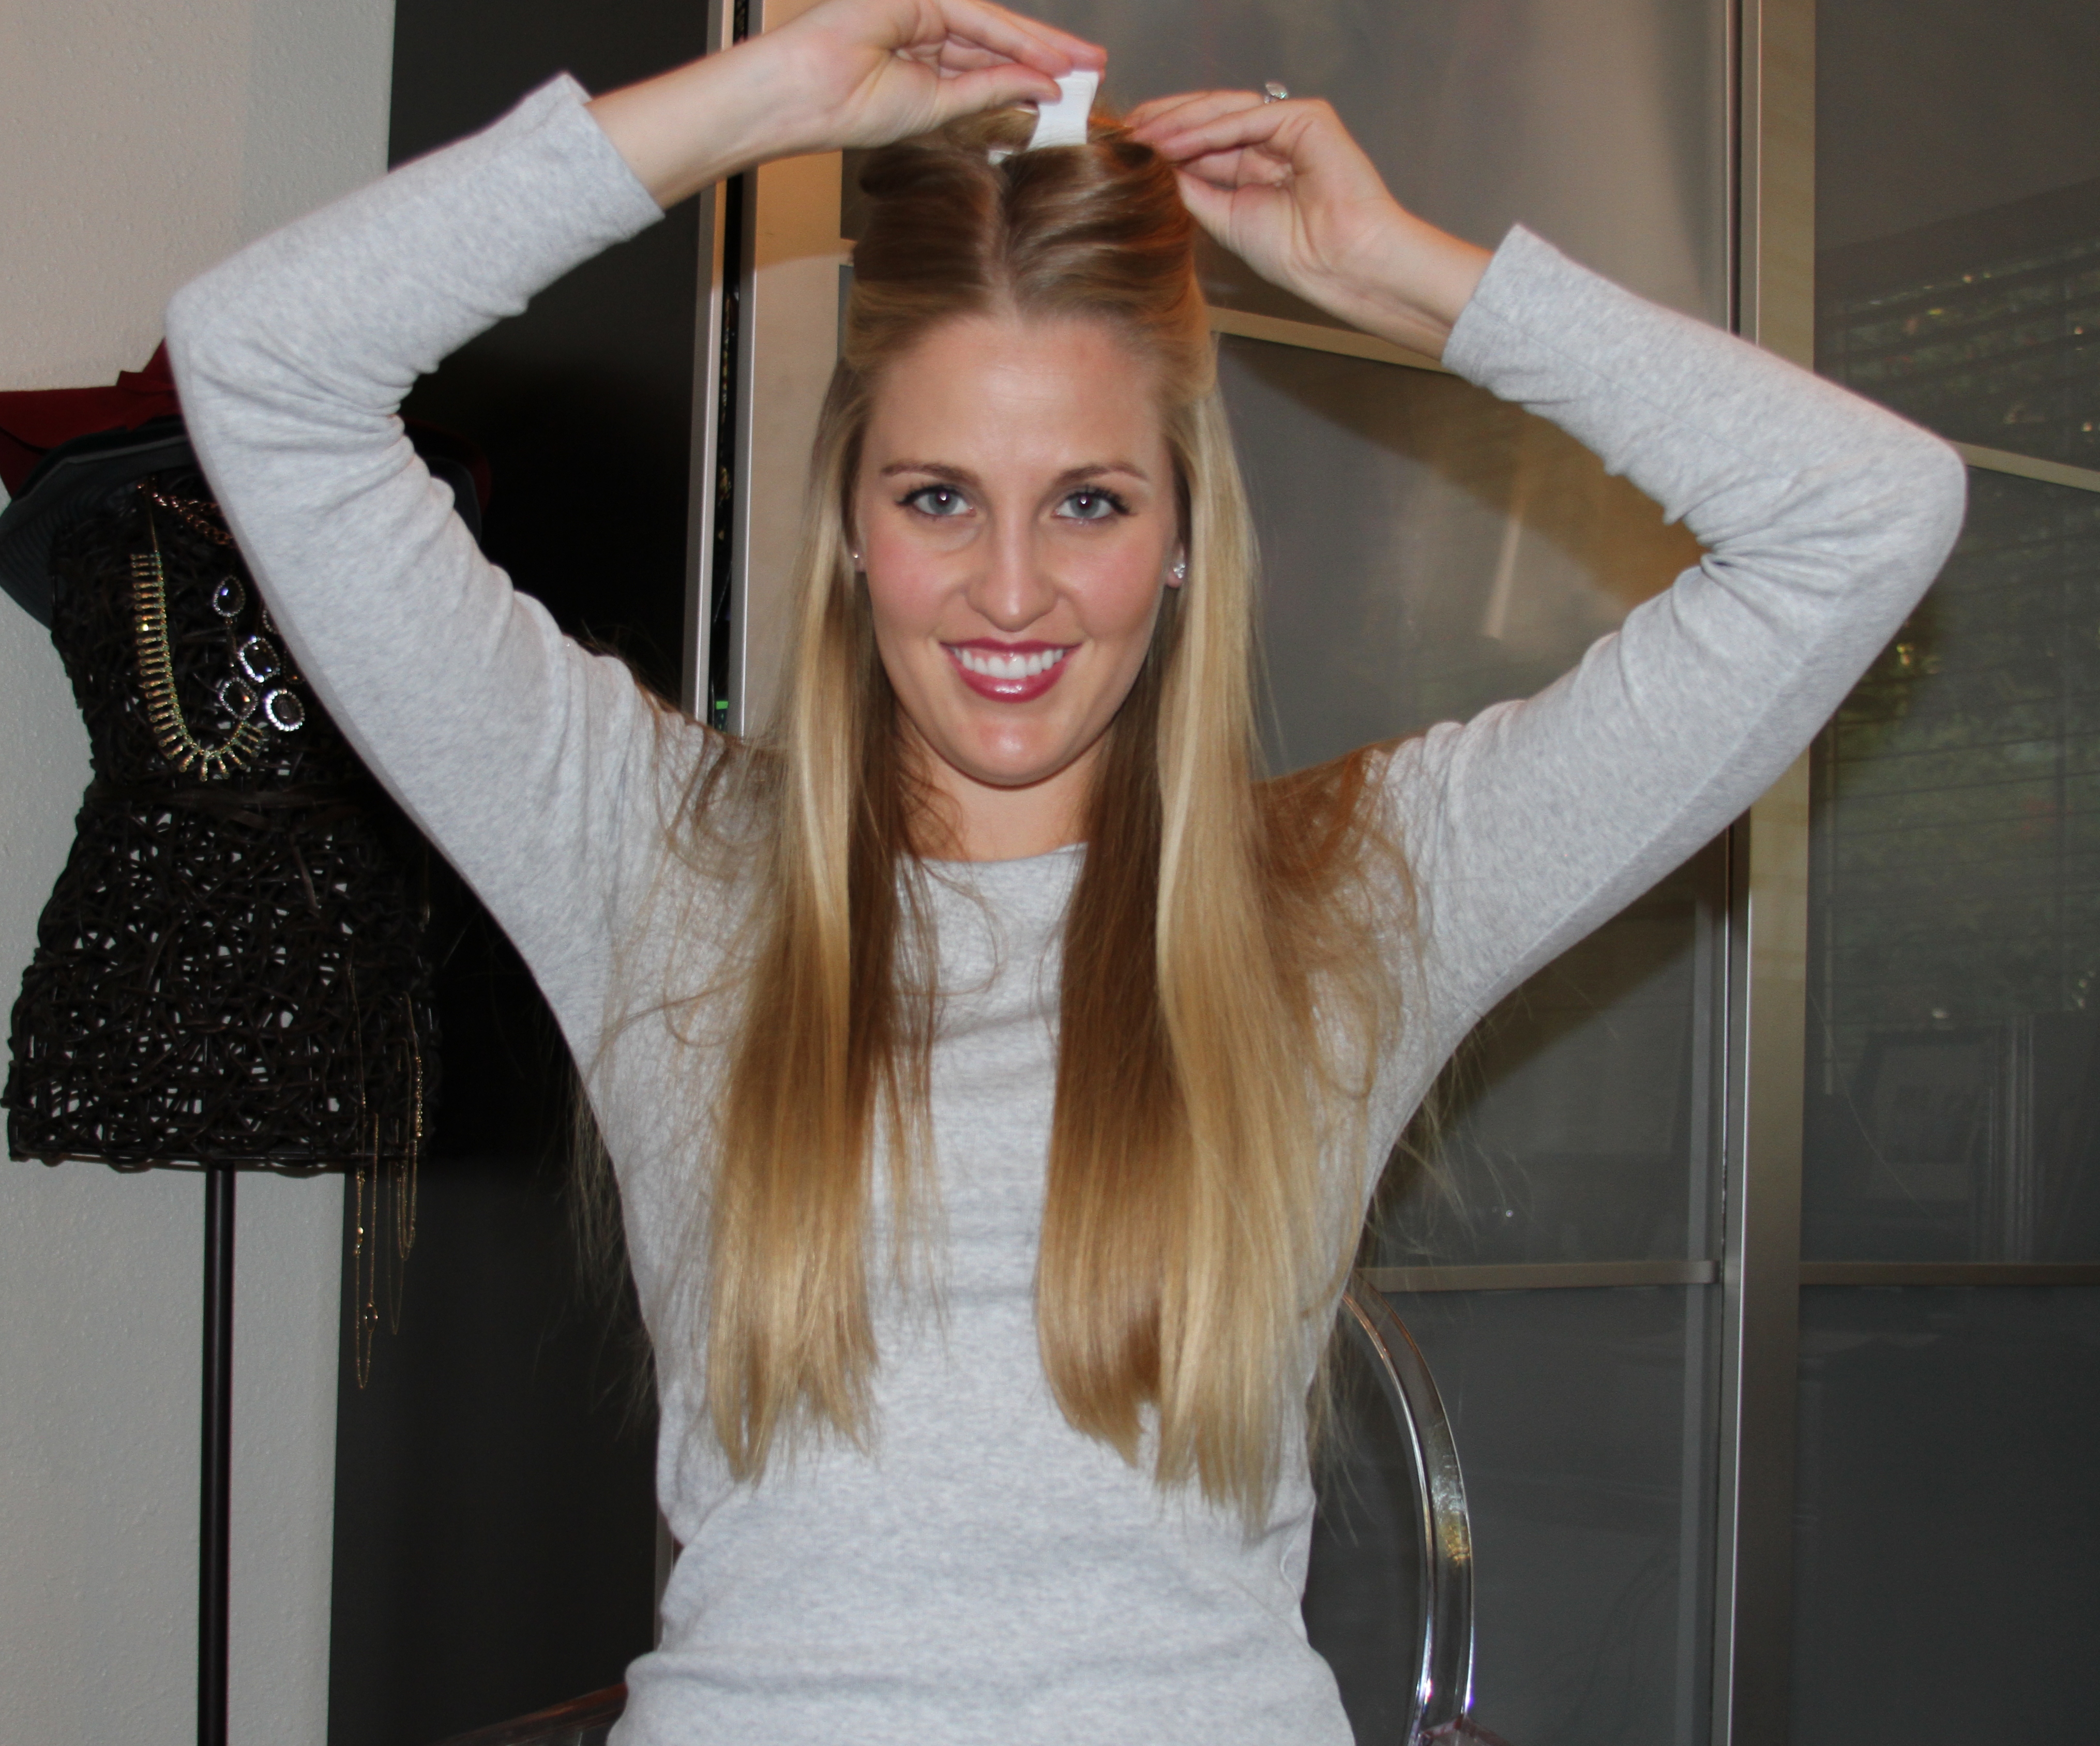
Step 1. Start with blow dried hair (I recommend washing your hair in the morning and letting it get dirty for the day and then curling it in the evening for best results). Spray with a curling setting spray.

Step 1 Straight Hair

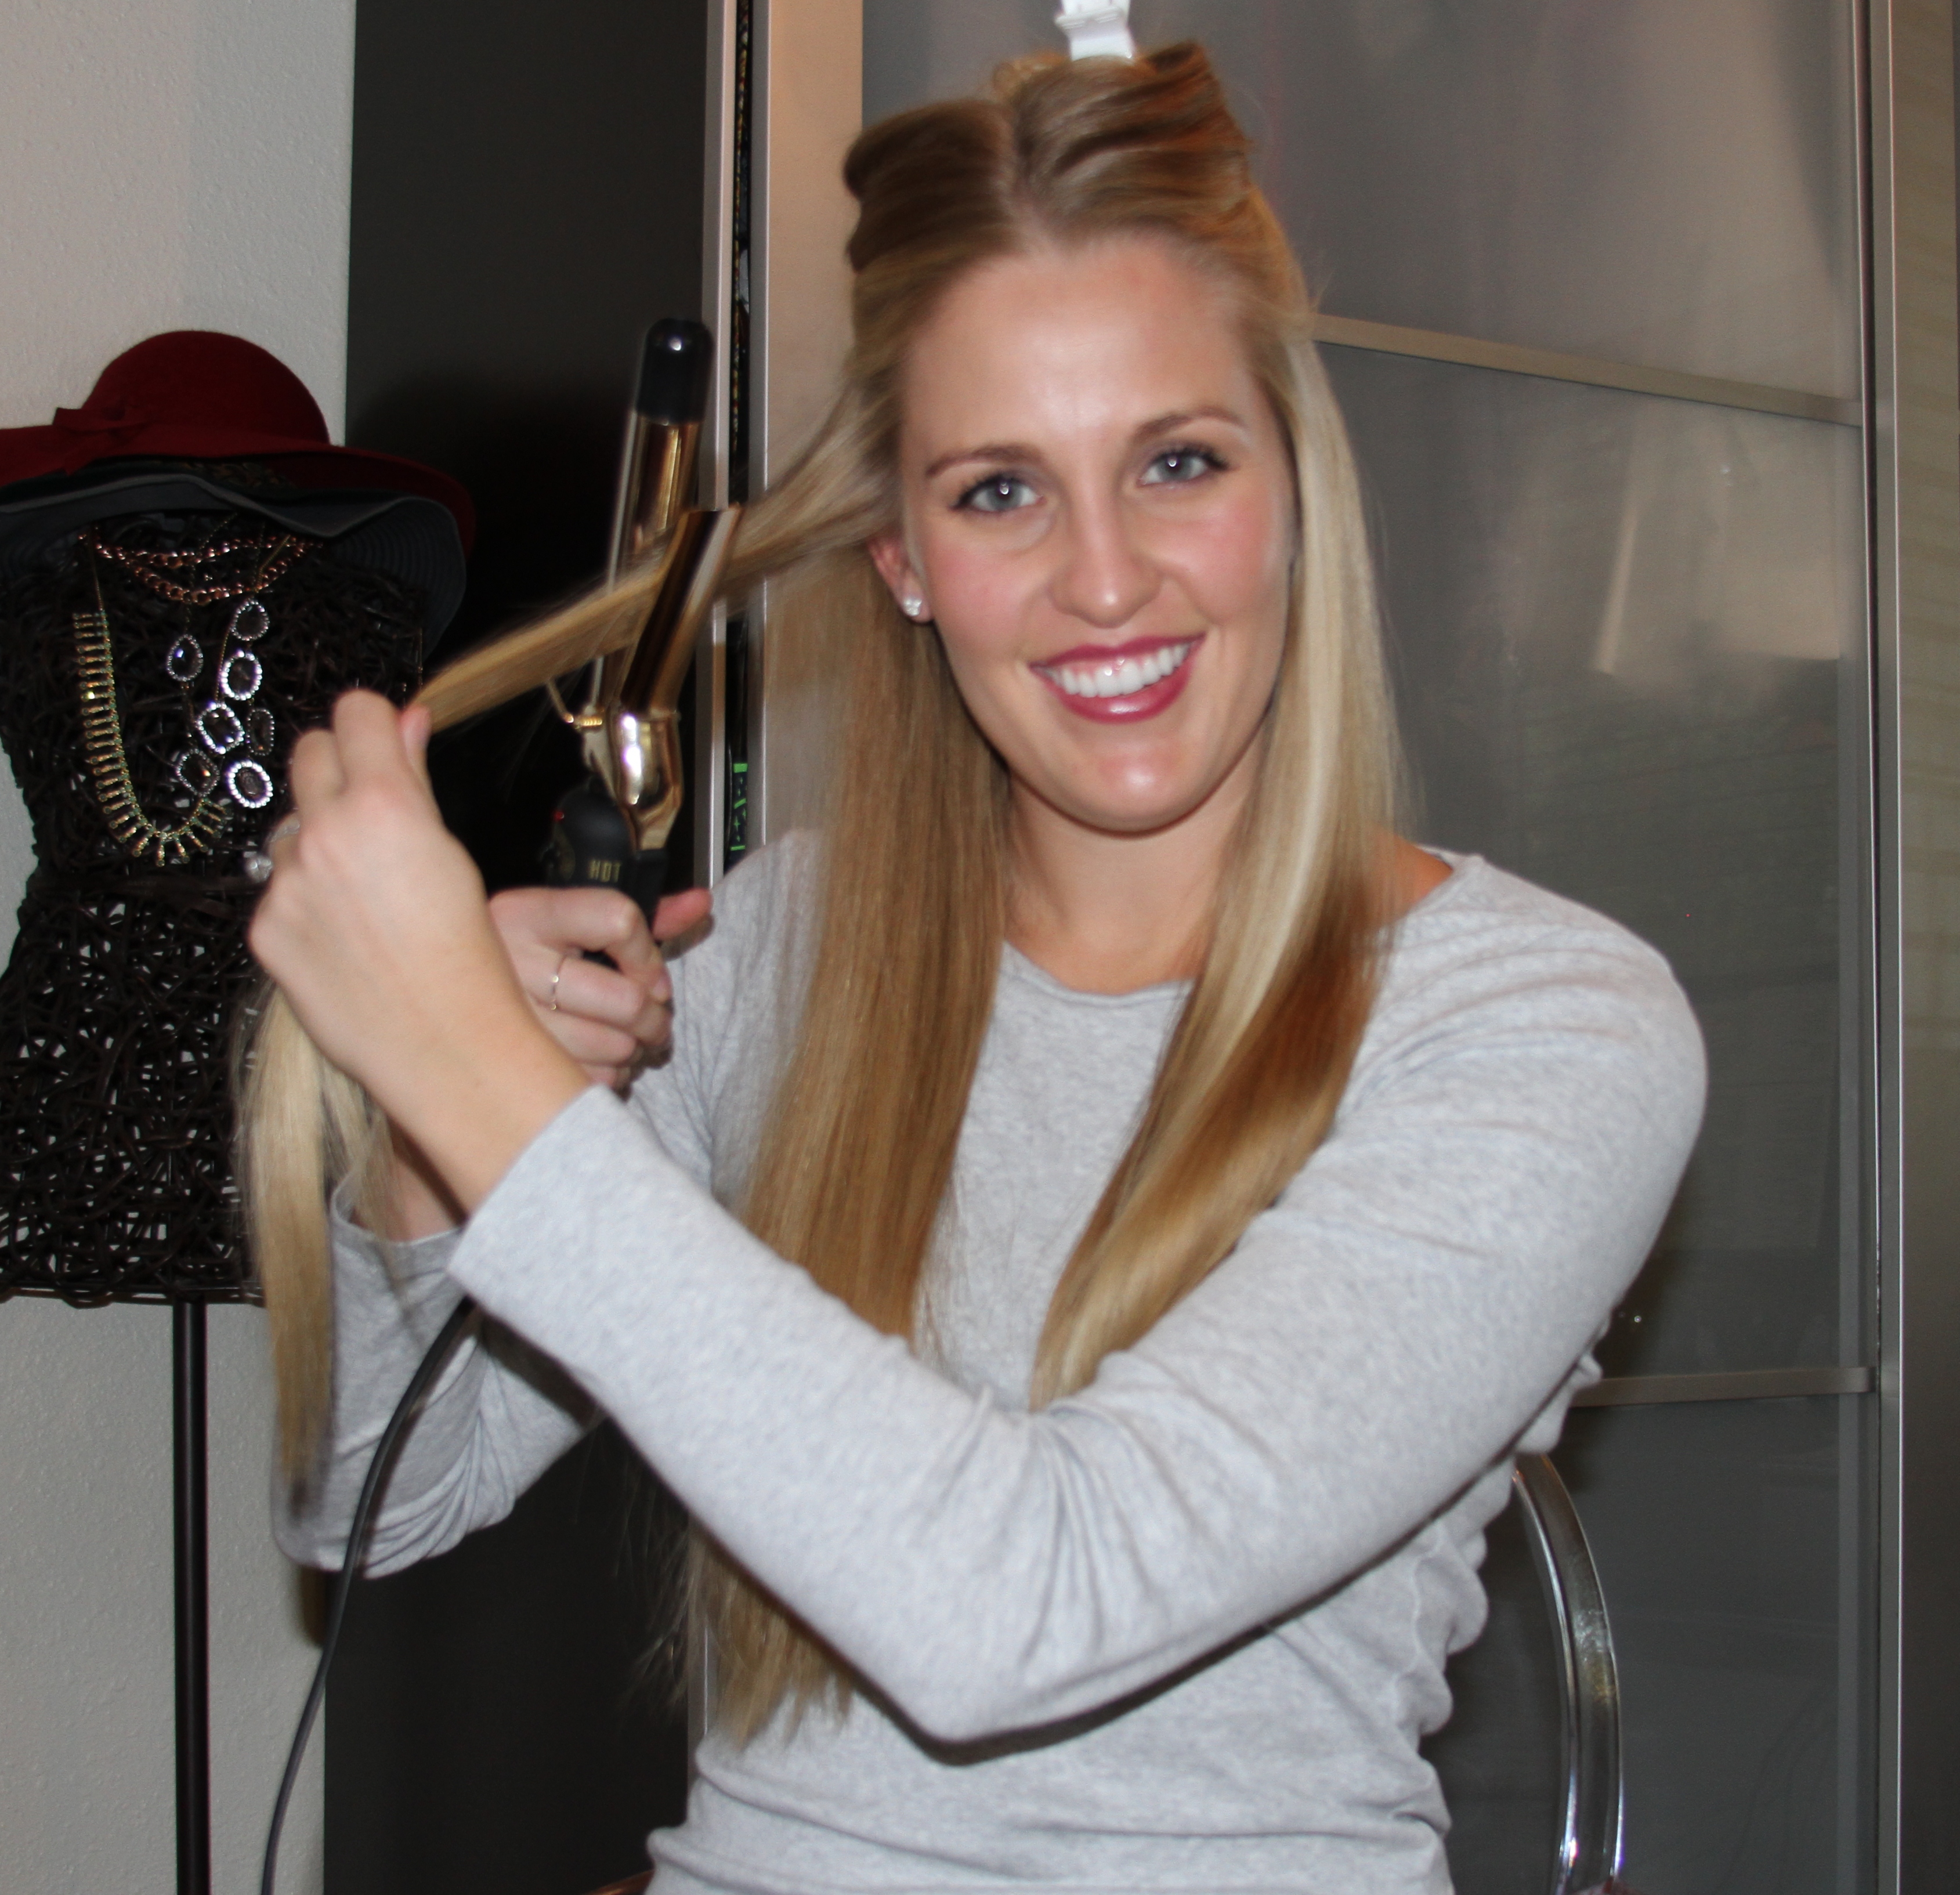
Step 2. Create a deep part and start curling hair (on side of part with less hair).  I start curling at about eye level.

Step 2 Curl

Step 3. Curl hair TOWARDS your face and hold curl for 5-10 seconds.

Step 3 Full Curl

Step 4. After releasing the curling iron, coil hair into a tight curl.

Step 4 Tight Curl

Step 5. Pin curl in place with bobby pins (or hair clips if you have them).

Step 5 Bobby Pin

Step 6. Continue curling hair on the right side of your head (or which ever side you are curling), repeating steps 2-5.

Step 6 Continue Curling

Step 7. Finished right side!

Step 7 One Side Curl

Step 8. Clip up top portion of hair on right side.  Begin curling hair in same fashion as before (curled TOWARDS face).
Step 8 Pin Half Up

Step 9.  Keep curling and pinning hair.

Step 9 Keep Curling

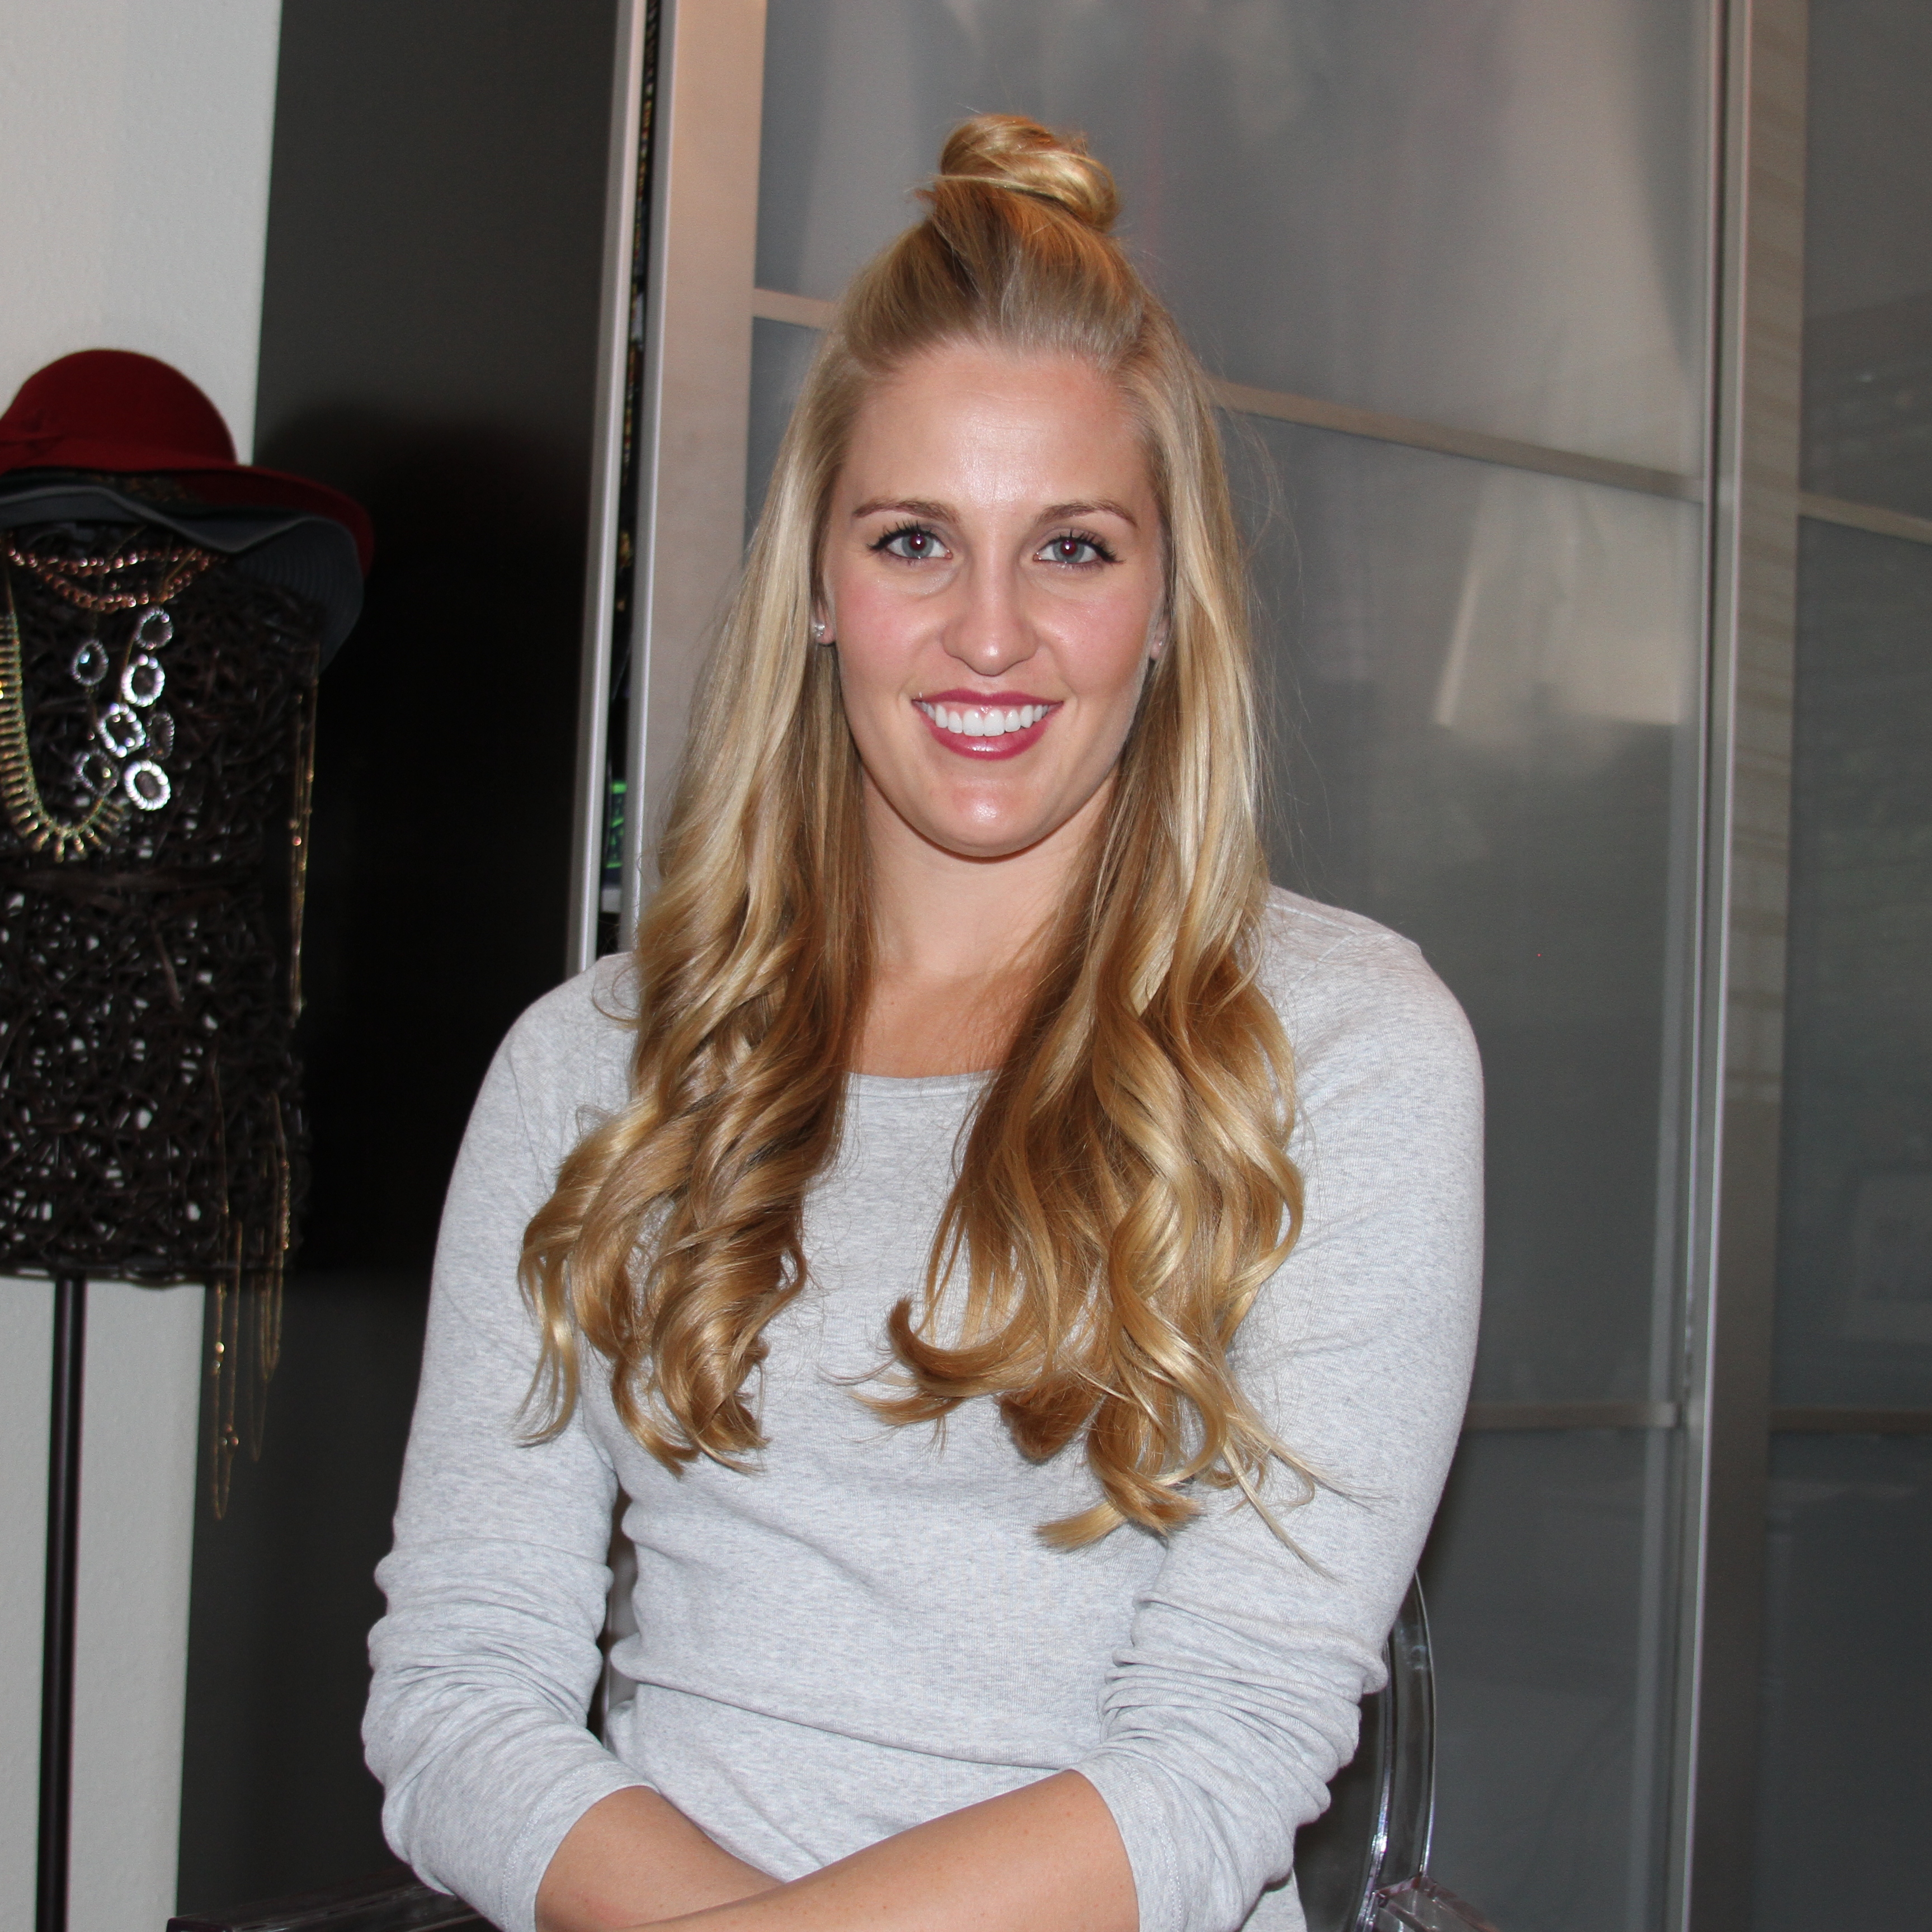
Step 10. Let down top portion of hair and tease the crown (if you would like some lift).  Brush it out and continue curling following steps 2-5.

Step 10 Curl Top Portion

Step 11. Let hair sit in curls for about 15 minutes – a great time to do your make up!  Remove bobby pins.

Step 11 Take Out Pins

Step 12. Finger brush your hair out (don’t worry about any dents yet!).

Step 12 Finger Brush

Step 13. Twist curls together in one face-ward motion.

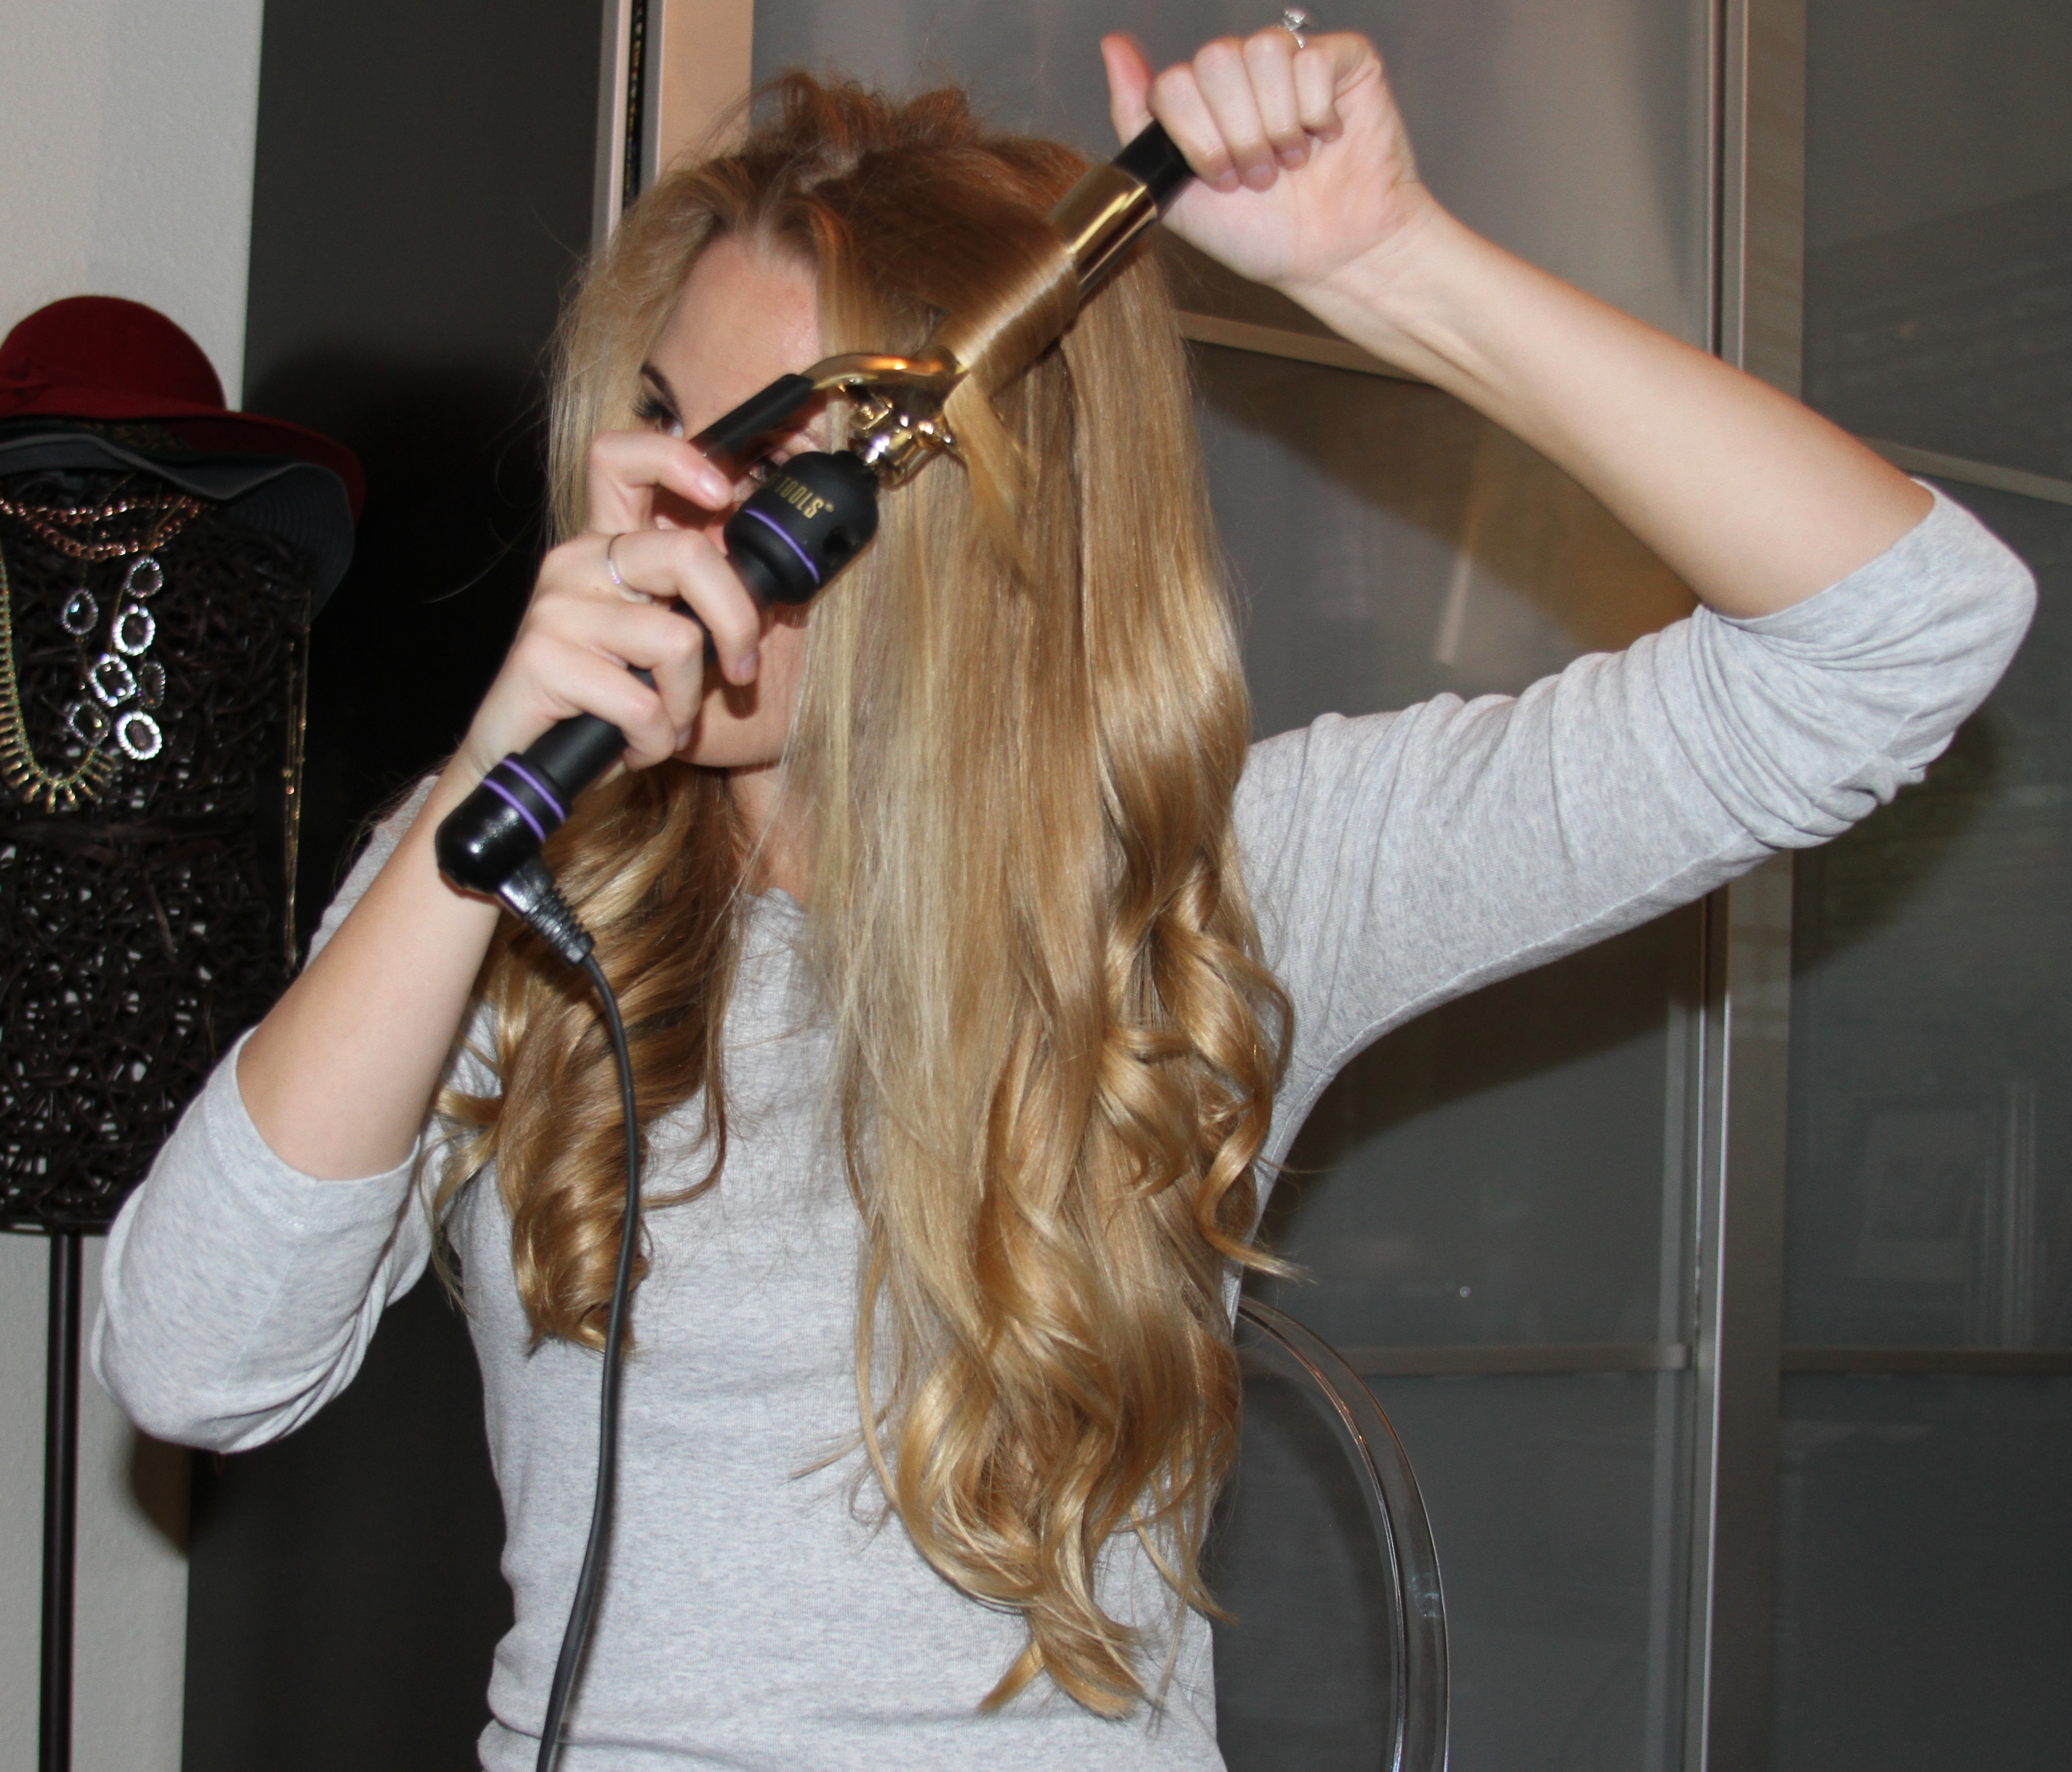
Step 14.  Gently run a curling iron over any dents to remove creases.

Step 15 Smooth Dents

Step 15. Use your fingers to brush out the right side of your hair and smooth curls.

Step 16. Spritz with some finishing spray and catch up your Mad Men reruns 🙂

Step 17 Retro Curls

Looks

Victoria Secret Hair

November 7, 2013

When I get dressed the first thing I do isn’t to pick my favorite shoes or my favorite top, but to decide who I want to be.  Sometime’s it’s the successful business executive, sometimes I want to be Jenna Lyons or Michelle Pfieffer in Scarface or maybe I’m having a hippy-boho moment… but for those times I just want to be goddess I bust out this hair style – Victoria Secret Hair.

victorias-secret-hair-and-makeup-2010-11-10-16-0-17

In college one of my roommates used to curl her hair daily and I didn’t understand how she had the time… until I discovered this hairstyle.  I literally can have curled, voluminous hair in under 10 minutes! Here’s how…

Prep. Use a volumizing shampoo/conditioner and blow dry hair.  Spray with a thermal protectant spray.

Blow Dry Hair

Step 1. Brush out your hair.  Brush Hair

Step 2. Clip up the top portion of your hair. 
Clip up hair

Step 3. Use a 1/4 inch barrel and curl away from your face (start 1/4 of the way down from your scalp).  1/4 Barrel Curling Iron

Step 4. Start curling at the top of the strand and work your way down (don’t curl from the end of your hair up) Hair Curling

Step 5. Let down the 2nd section of hair and continue to curl hair away from your face. Curl Away from Face

Step 6. Finish curling 2nd section (just make sure to curl away from your face on both sides) Finished Curls

Step 7. Tease your crown (I work in 3 sections, from back to front) Tease your Hair

Step 8. Curl top section of hair (make sure to start curl around eye level – don’t curl to root) Curl Crown of Hair Step 9. Curl the pieces around your face last (these are the most important!) Curl your Hair

Step 10. Add a little (or a lot) of hairspray and voila!!  Victoria Secret Hair

Looks

How to Style a Ballet Bun

September 10, 2013

Ballerinas image via Martha Stewart Weddings

With the temperatures at an all time high this week, my long hair is not conducive to staying cool… the answer – the bun!  I’ve been asked for tips on how I do my bun, so I wanted to share my tips with you all… here we go!

Before you begin… hop in the shower and run a deep conditioner through your hair (you don’t even fully have to rinse it out).  I spray a detangler or leave-in conditioner and run a restoring product through my ends (I use hair days like this to give my hair a break and help bring it back to life!!). Once you’ve done that… we’re ready to go!

Hair Products

1. Brush out your hair.

Brush Hair

2. Flip hair upside down and brush your hair out until smooth.

Hair Brush

3. Use a fine toothed comb to brush out any lumps.  Make sure to go through the base of the pony so you don’t have a lot of bumps on your crown.

Comb Hair

4. Secure ponytail with a rubber band (or two in my case).  You want it to be tight but not not so much that you have a headache all day 🙂

Rubber Band

5. Twist pony tail and start wrapping it around the base of your ponytail.

Make a Bun

6. Continue to wrap your ponytail around your existing hair.

Twist Bun

7. Once your ponytail is fully wrapped around you have a couple options – 1. You can pin your hair at this point or 2. Continue on with the rest of my tutorial.

How to Bun

8. Lift the thicker/top portion of your bun upward.

Finish Bun

9. Pull that section forward and tuck the thinner strand underneath the thicker portion.

How to Make a Bun

10. Secure bun with bobby pins.  I try to lay them parallel to my scalp so they are concealed and secure.

Bobby Pins

11. Enjoy your simple, easy do for the day! Finish with hairspray!

Finished Bun